Installing Brother P-touch Tape: A How-To Guide!
Posted by Bryan L on 12/23/2024
Installing Brother P-touch Tape: A How-To Guide!
If you're new to the world of label makers, you might feel a little intimidated when it comes to installing your first roll of tape. But don’t worry—installing Brother P-touch tape is straightforward and takes just a few minutes. As someone who has been using and selling Brother P-touch products for years, I’m here to guide you through every step of the process.
Whether you're using the label maker to organize your home, streamline your small business, or label cables and equipment, this step-by-step guide will have you printing perfect labels in no time.
Why Brother P-touch Tape is a Game-Changer
Before diving into the installation process, let’s talk about why Brother P-touch tape is so popular. Brother’s laminated tape technology makes their labels water-resistant, fade-proof, and durable enough to withstand extreme temperatures. Whether you’re labeling files in an air-conditioned office or tools in a hot workshop, P-touch tape stays put and remains legible.
I remember labeling the shelves in my garage years ago. I used P-touch tape to mark bins for screws, bolts, and other small parts. Those labels are still there, unfaded, after years of use and occasional spills—a true testament to their durability!
Tools You’ll Need
Here’s what you’ll need to get started:
- A Brother P-touch label maker (e.g., PT-D220 or PT-H110).
- A roll of Brother P-touch tape, like the TZe-531 Black on Blue tape or any other size and color that fits your needs.
- A clean, flat surface to work on.
Pro Tip: Always make sure your label maker is turned off before installing tape. This reduces the chance of errors during the process.
Step-by-Step Guide to Installing Brother P-touch Tape
Step 1: Open the Label Maker
Locate the tape compartment, usually on the top or bottom of your Brother P-touch label maker. Gently lift the door to open the compartment carefully.
If you’ve never done this before, don’t worry—the door is designed to be sturdy but easy to open. Just press pull, and the cover should pop right open.
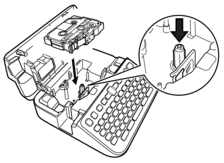
 Step 2: Insert the Brother P-touch Tape
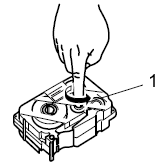
- Gently rotate the green gear clockwise a couple of turns to tighten the tape. This step is crucial to prevent slack, which can cause printing issues.
- Align the tape cartridge with the grooves inside the compartment. Make sure the tape feeds through the designated exit slot correctly.
- Double-check that the tape is seated firmly in place but don’t force it.
I’ll admit that the first time I installed a tape cartridge, I skipped the green gear step, thinking it wasn’t necessary. Needless to say, my labels came out misaligned until I went back and followed the instructions. Lesson learned: always tighten the tape!
Step 3: Close the Tape Compartment
Once the tape is securely in place, close the compartment cover. You should hear a soft click when it’s locked properly. If it doesn’t close easily, double-check the alignment of the tape cartridge.
Step 4: Test the Installation
Power on your label maker and print a test label to ensure the tape is installed correctly. If the label prints smoothly and evenly, you’re good to go!
If you notice any issues, such as blank labels or uneven printing, recheck the tape alignment and ensure the green gear was properly tightened.
 Common Mistakes to Avoid
Even though the process is simple, beginners often encounter a few hiccups. Here are some common mistakes to watch out for:
- Skipping the Green Gear Step: This can lead to slack in the tape, causing jams or poor-quality labels.
- Using the Wrong Tape Size: Always confirm that the tape cartridge is compatible with your label maker model.
- Forcing the Cartridge: If it doesn’t fit easily, double-check the alignment instead of forcing it.
Avoiding these pitfalls will save you time and frustration, especially if you’re new to label makers.
Pro Tips for Getting the Most Out of Your Brother P-touch Tape
1. Choose the Right Tape for Your Project
Brother P-touch tapes come in various colors, sizes, and adhesive strengths. For example:
- TZe-531 Black on Blue Tape: Perfect for creating eye-catching labels that stand out on white or light surfaces.
- Extra Strength Adhesive Tapes: Ideal for industrial use or textured surfaces.
- Flexible ID Tapes: Best for labeling cables and wires.
2. Keep the Tape Tight
As mentioned earlier, always tighten the tape by turning the green gear. This ensures a smooth printing experience and prevents tape waste.
3. Store Tape Properly
Store your tapes in a cool, dry place to maintain their adhesive quality and prevent fading. If you’re like me and have a collection of tapes for different projects, consider labeling your tape storage box—with a P-touch label, of course!
4. Regular Maintenance
Clean the tape compartment periodically to remove dust and debris that can cause jams. A soft, dry cloth works well for this.
FAQs About Brother P-touch Tape Installation
What tape sizes are compatible with my Brother P-touch label maker?
Check your label maker’s manual or the product page on PtouchDirect.com for a list of compatible tape sizes and types.
Why is my label printing blank?
This could be due to slack in the tape, low batteries or improper installation. Recheck the green gear and ensure the tape is correctly aligned.
Can I reuse partially used tape cartridges?
Yes, you can switch out cartridges as needed. Just make sure the tape is properly tightened before reinstalling.
Final Thoughts
Installing Brother P-touch tape is easier than you think, especially with this step-by-step guide. Whether you’re organizing your workspace, labeling tools, or creating custom signs, following these instructions will ensure your labels come out perfectly every time.
Remember, if you ever need more supplies or advice, visit PtouchDirect.com. With over 18 years of experience selling Brother P-touch products, we’re here to help you get the most out of your label maker.
